Learn To Create The Most Angelic Cat You Have Ever Seen
- May 27, 2016
- 3 min read
Hi peeps, having a good week?
Here’s something fun for you to try out this weekend! In this tutorial, I’ll show you how to create a fantasy scene using a variety of photo manipulation techniques. You’ll learn how to make a fresh spring scene with grass, flowers, butterflies and especially a cute fairy kitten. Let’s begin!
Final Image
Software: Photoshop CS3 +
Difficulty : Intermediate
Estimated Completion Time: 90 minutes
Resources Used In This Tutorial:
Beautiful Butterfly 1: 24266163
Beautiful Butterfly 2: 40561462
Cute Kitty: 15276865
Meadow: 12891463
Pink Gerbera 3: 31779288
Pink Gerbera 1: 31779287
Pink Gerbera 2: 39540356
Pink Gerbera 3: 31779288
Summer Sky: 29458259
Step 1
Create a new 800×600 px document in Photoshop and fill it with white color. Drag the sky image into the white canvas as shown below:
Step 2
Go to Layer > New Adjustment Layer > Hue/Saturation and change the Hue and Lightness settings:
Step 3
Use a Curves adjustment layer to brighten the sky a bit. Select this layer mask and use a soft black brush to paint on the right side of the sky to make it a bit darker than the left (we aim to make the light come from the left):
Step 4
Drag the grass image into our main document and place it in the bottom half:
Add a mask to this layer and use a soft black brush to blend the sky part with the existing sky. Lower the brush opacity when blending around the grass area:
Step 5
Open the flower images. Isolate them from the white background and place them between the grass blades. Duplicate and transform them using Ctrl+T if needed to make them appear slightly different. Make one in the middle bigger than the rest – we aim to add the cat there:
Step 6
Make a Hue/Saturation adjustment layer for the big flower and set it as Clipping Mask. Change the Magentas settings:
Step 7
Use a Curves adjustment layer to brighten this flower. Paint on the right side to make it a bit darker than the left:
Step 8
Select all the other flower layers and hit Ctrl+G to make a group for them. Change the mode of this group to Normal 100%. Add a Hue/Saturation adjustment layer within this group to change the flowers color:
Step 9
Use a Curves adjustment layer to brighten these flowers:
Step 10
Group all the flower layers including the big one. Add a mask to this group and use a hard black brush to show some grass blades, make them cover the flowers stems.
Step 11
Isolate the cat and place him onto the big flower:
Make a new layer under the cat one and use a soft black brush with the opacity about 30% to paint his shadow on the flower.
Step 12
Create a new layer and use a hard brush with the color #f1e9e2 and #d3c3b6 to paint the missing furs for the cat:
Step 13
Make a group for the cat and the furs. Use a Color Balance adjustment layer and change the Midtones and Highlights settings:
Step 14
Make a Photo Filter adjustment layer and pick the color #01ceec to create the reflection of the background light on the cat. Paint inside his body to make the effect only visible on the contour:
Step 15
Create two Curves adjustment layers to correct the light and shadow on the cats. The selected areas show where to paint on the layer masks:

Step 16
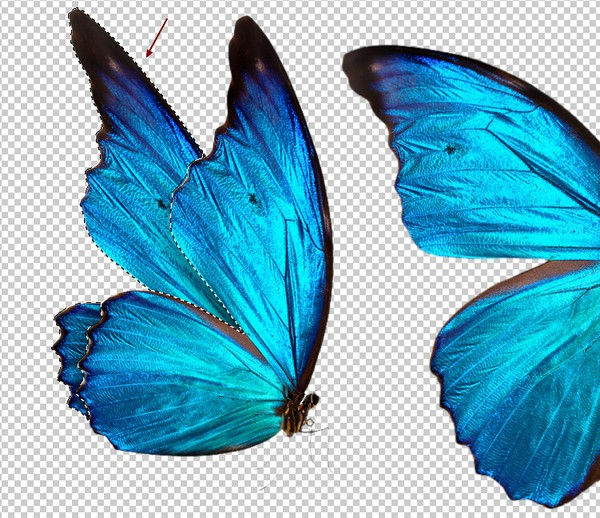
Open the butterfly wings image and isolate them from the background. Select a wing of the butterfly on the left and place it onto the cat back.
Use a layer mask to blend the wing with the cat:

Step 17
Select another wing of this butterfly and add it to the cat back. Place this layer under the first one:

Step 18
Make a group for the wings and use a Hue/Saturation adjustment layer to desaturate them a little:
Step 19
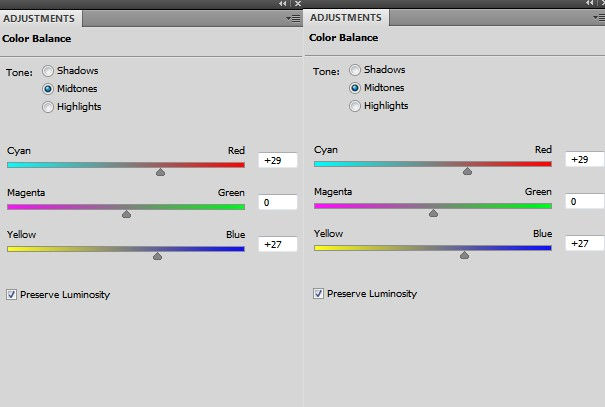
Create a Color Balance adjustment layer and change the Midtones and Highlights settings:

Step 20
Use a Photo Filter adjustment layer and pick the color #10d2e9:
Step 21
Make a Curves and a Levels adjustment layers to change the light and shadow of the wings:


Step 22
Cut out the butterflies from another image and add them around the cat. Place one of them above the cat to fit his eye direction.
Step 23
Use a Hue/Saturation adjustment layer to change the butterflies color:

Step 24
Make a Color Balance adjustment layer to make the butterflies more vibrant:
Step 25
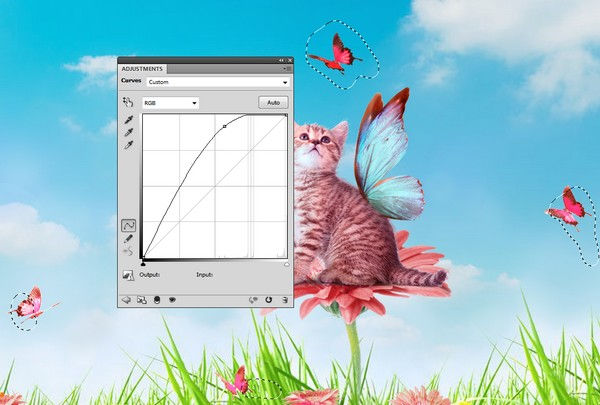
Create two Curves adjustment layers to increase the light for the butterflies:

Step 26
Make a Color Fill Layer on top of the layers and fill with the color #020913. Change this layer mode to Exclusion 100%:

Step 27
Create a Photo Filter adjustment layer and pick the color #edce01:

Step 28
Use a Curves adjustment layer to increase the contrast of the scene.
Step 29
Add a Selective Color adjustment layer and change the Reds and Yellows settings:

Step 30
Use a Vibrance adjustment layer to enhance the final effect:

So what do you think? Do you like the final effect or created something better using this technique? Do share with us in the comments below or email us at fb@123rf.com so we can have a good look at your finished work!
Other Tutorials That Might Interest You;)


Comments