How to Insert Your Hand Lettering Into A Mockup
- Dec 14, 2017
- 3 min read
Interested in learning how to insert your hand lettering into a product mockup using a creative program like Pixlr, Vectr or Photoshop?
In a previous lesson, we’ve covered how to create your own vectorized monoline lettering, which we’ll incorporate into this tutorial to show you how to place your lettering work into any product – and thus creating a mockup.
What you’ll need
Image of a product/mockup Your hand lettering artwork Creative programs: Pixlr, Vectr, or Photoshop CS5 (or higher)
How to Insert Your Hand Lettering Into A Mockup
Coffee Mug Mockup
For this example, we’re going with a white mug image.

Create a rectangle about the same size as the mug. The color of the rectangle doesn’t matter because that will disappear later on.

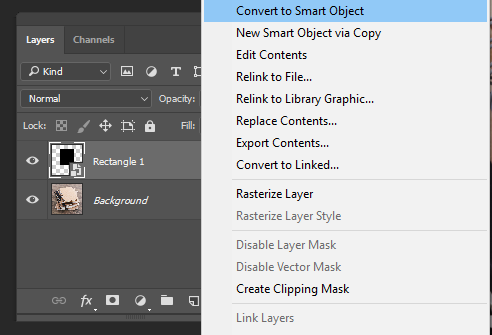
Go to the Layers panel (F7), right-click on the rectangle layer and select Convert to Smart Object.

Lower the opacity of the rectangle so you can see the mug behind it.

With the Free Transform Tool (Ctrl + T), right-click on the rectangle and select Warp.

In the Warp options, select “Arch” and add the value “-50” to the Bend.

You can now select the Custom option and change the handles so it fits the mug. Press Enter to apply the changes.

Double click on the Smart Object to open it on another window. This is where the rectangle will show up just like before we made the distortions with the Warp tool. You can either delete the rectangle or just hide the layer. Insert your hand lettering artwork into the Smart Object on the new window and Save (Ctrl + S) it.

That’s it! Now you have a brand new mock-up of a white mug!

Adding Textures
Now, let’s go one step further: adding texture to your lettering. We went with this shiny gold paint texture.
Place the picture of the gold texture on top of your lettering layer. Right-click on the gold layer and select Create Clipping Mask.

Your lettering will look like this:

Hit save on your file and head back to the mockup window. Now select the Smart Object layer and put the Blend mode to Multiply. This mode helps make your lettering look more realistic on the coffee mug surface.

And there you have it! We’re in love with the glitzy bling.

Notebook Cover Mockup
Next, you’re probably wondering how to add your lettering design onto a mockup image with a perspective angle.
We chose this stack of notebooks that was taken from a good angle – seems a little tricky to maneuver your artwork onto it, but it’s easy once you get the hang of it.

Open the photo in Photoshop. Create a rectangle that’s roughly about the same size as the notebook cover.

Right-click on the rectangle layer and select Convert to Smart Object.

Lower the opacity of the rectangle so you can see the photo. With the Free Transform Tool (Ctrl + T), right-click on the rectangle and select Distortion.

Select the points on each corner of the rectangle to fit into the notebook. Your mockup should look something like this:

Hit enter to apply all the changes you just made with the Distortion tool. Now double-click on the Smart Object to open it on another window.
Insert your hand lettering artwork into the new window and hit Save (Ctrl + S).

Now let’s change the color of your lettering to make it pop up! Create a new Solid Color layer through the Layers Panel.

Select the color of your choice – we went with a light pink for some contrast! Now right-click on the fill layer and select Create Clipping Mask, so the color will show up on the lettering only.

That’s basically it! Now you have a mockup of a notebook cover with your lettering on it.

The possibilities are endless! You can apply the same principles that you just learned here into any image of a product or mockup you might want to insert your lettering.
–
If you enjoyed learning how to insert your hand lettering into a mockup, explore more of our creative tutorials!


Comments