How To Combine Stock Photos Into A GIF Animation
- May 23, 2014
- 4 min read
Inspirational quotes are the easiest way to win over the internet. And since Tumblr is known as the land for great quotes and animations, this tutorial is a mash up of both, inspired by its creative users using stock photos! Learn how to add flair to one of your favorite quotes with this fun GIF animation!
Images used for this tutorial:

Old memory old camera: 21437279 © Warut Chinsai

Starry deep outer space nebula and galaxy: 14718596 © rustyphil

Galaxy: 15159001 © Christian Suroy
Step 1
Open all your images in Photoshop. The main image we’ll be using today is the vintage camera (Image ID: 21437279). Double click the background layer and rename it “Layer 1.” Place the first galaxy image (Image ID: 14718596) onto the canvas by dragging the file over to the camera image. Name this second layer, “Layer 2.” Create a new group and add Layer 2 into the group, to help with future organization.

Step 2
A) Using the Move Tool (V) position the galaxy image over the camera. Bring down the opacity of the galaxy layer so that you can see some of the camera through it. Select the Pen Tool (P) and begin tracing the black section on the front of the camera’s body. Make sure to include both sides. Right-click to create a vector maskand unlink the galaxy layer from the mask. Unlinking the layer will allow us to freely switch up the placement of the galaxy image.
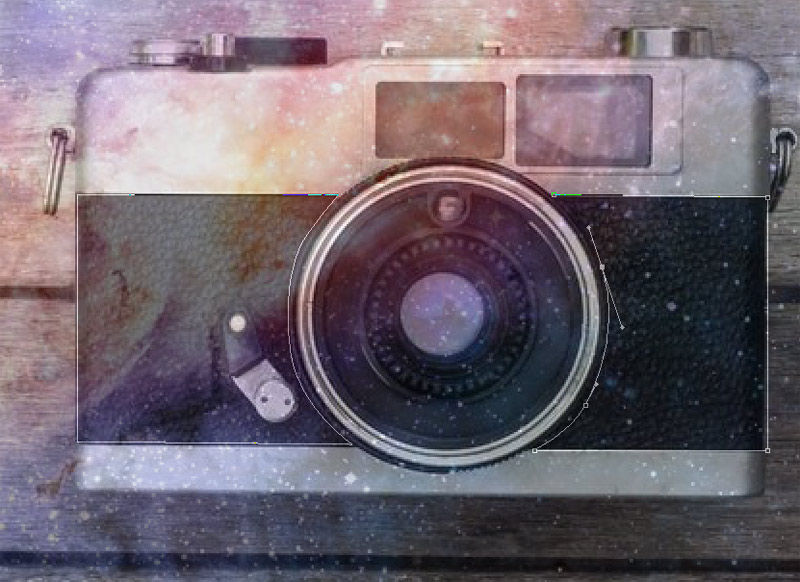
B) Using the Pen Tool again, select the vector mask. Trace around the front handle. Right-click to make a selection and fill the selection with black. This will allow the handle to peek through the galaxy without interfering with the image or animation. When you’re done, return the galaxy layer to full opacity.
Step 3
Right now the galaxy looks too flat on the camera. To add more dimension you’ll have to create a new layer, and with a soft round brush set to low opacity, paint black shadows on the left and right sides of the camera that will match up well with the shadows already present. Set the layer to Multiply and adjust the opacity accordingly, in this case, 46%. Right-click to create a Clipping Mask.

Step 4
Since the vector mask allows you to move the galaxy around without disturbing anything, we’re going to use only this image for the animation part. Select the galaxy layer and duplicate it three times to have a total of four options. When you select the galaxy layer it will automatically include the clipping mask. For each new layer move the image around so that the galaxy is in a new position. You can even flip one of the images to change it up even more.
Step 5
Now that we’ve set the image up for the animation we’ll finish the general edit. On a new layer above Group 1, drag the second galaxy image we’ll be using for this tutorial (Image ID: 15159001). Position the image so that the center of the galaxy is at the center of the camera lens. Set the layer to Screen.
Step 6
To enrich the wood grain even further, add a new layer above the second galaxy and select the Brush Tool (B). Using a soft brush set to a low opacity, paint the color black onto the wood, deepening it further around the edges of the camera. Set this layer to Overlay.

Step 7
A) To fit the theme of the vintage camera, we’ll give the overall image more retro inspired elements. The first element is to add the quote. With the Type Tool (T), type your quote using a font with a very vintage feel, in this case, Courier New. Set the font size at 72 pt. Hold the Alt key and use the left and right arrow keys between each letter to further adjust the kerning.

B) Under this type layer, add a new layer. To help the text stand out from the wood, paint the color white using a soft round brush. Paint it so that the white is more concentrated towards the center. Then set this layer to Overlay.
Step 8
A) The next vintage element we’ll add is the color. Add two new layers. Fill one layer with the color yellow (#d8ee1e) and the layer above it with the color purple (#7f1bdb). Set the yellow layer to Color and bring down the opacity to 15%.

B) Set the purple layer above it to Exclusion with opacity at 24%. Now the image is beginning to look like one of the retro inspired pictures we see on Tumblr!
Step 9
A) Before we move onto the animation we will bump up the lighting and contrast of the image. Go to Layer > New Adjustment Layer > Brightness/Contrast. Set the Contrast to +69 and lower the Brightness to -29.

B) Above that layer add another New Adjustment Layer, this time using Levels. Set the RGB Input Levels at 0, 0.75, and 235.
Step 10
A) Now that the image is edited we can move onto the animation. Open your animation panel in Photoshop by going to Window > Animation. Select the “Convert To Frame Animation” option. Select the first frame and set the delay time to “No delay.”

B) Now select “duplicates selected frames” and make four duplicates of your first frame for a total of five frames. Each frame will act a new frame for your animation.
Step 11
Go back to the original Group 1 with your masked galaxy layers. For each new frame, keep only one galaxy layer visible while the rest remain hidden. The first and the last frame should be the same so that when you play the animation, the galaxy changes between frames.

Step 12
If you play the frames now it’s a fast and jerky animation. To smooth the effect, select the first two frames hit the Tween button and set the value for “Frames to Add” to 3. Continue this step for the remaining frames that switch abruptly. Now you should have a smooth and blended transition. Also make sure the looping option is set to play Forever, so that you have one continuous loop. Now your animation is done!

Step 13
Save this file by Saving For The Web as a GIF. You can adjust settings to bring down the file size or even make the image itself smaller. Once you are done have fun posting your animation to any social media site. Get to tumblin’!

That’s it! Feel free to try this technique with your favorite stock photos!


Comments