5 Steps To Brush Calligraphy (Learn For Free With Our Guide)
- Jul 22, 2020
- 5 min read
Updated: Apr 4, 2023
If you want to start in the world of calligraphy but you’re a little intimidated by the dip pen, a great alternative is to learn brush calligraphy. You’ll be able to get the same effects as if you’re using a dip pen, but it’s easier to control and learn. Let’s dive right into our hand lettering tips and tricks.
What you’ll need: Brush pen, printer paper, tracing paper
Pen Pressure

Photo by Sergii Mostovyi, 123RF.
The first thing you need to learn is that brush calligraphy only works with pen pressure. When you’re writing a letter or a word, you have to be aware of the thins and the thicks. When you’re pushing the pen down (named downstroke), you have to put more pressure on the pen so it will give you thick lines. If you’re going up (named upstroke), you have to put less pressure on your pen so the lines will be thin.
The Angle of Your Pen

Calligraphy styled quote in the making by rawpixel, 123RF.
In brush calligraphy, adjusting the angle you’re holding the pen with matters a lot. It’s hand lettering, after all, and it requires a delicate technique. You have to hold the pen at an angle to the right (if you’re a leftie, you would need to hold the pen at an angle to your left side). Try not to hold your pen upright, because it won’t give you nice thin and thick strokes. You also run the risk of ruining your pens much easier if you don’t hold them at the right angle.
The Best Brush Calligraphy Pens For Beginners
We can pretty much guarantee that you’ll get frustrated with brush calligraphy if you begin by using the wrong pens. There are pens that are better for beginners and pens that are for more experienced hands. The best brush pens for beginners are the small ones. These are our best brush pen recommendations for those just starting out:
Tombow Fudenosuke (hard brush tip)
Pentel Sign Brush Pen (comes in different colors)
Zebra Fude Sign Brush Pen (black, comes in 4 different sizes)
Once you gain more practice and experience, you can definitely upgrade to other brush pens like the Tombow Dual Brush Pen, Sakura Koi Brush Pen or Kuretake Brush Pen. But try not to start right away with these, because they are harder to control than the small brush pens.
The Right Paper Textures

Hand drawn illustration by Svetlana Shamshurina, 123RF.
There are very specific papers to use for brush calligraphy. The smoother the paper, the better. Because many paper textures have a high chance of ruining your brush pens easily, you’ll want to use the papers we mention here. For the printer paper types, we recommend using HP Premium Choice LaserJet Copy Paper. You can also use any brand of tracing paper. While these papers won’t ruin your pens, they will actually extend the life of your pens too, so that’s an added bonus. Other paper textures won’t be as kind to your pen tips.
The Basic Strokes
The art of calligraphy is all about patience. We know that when you’re just starting out, you’ll want to jump right in and expect to write beautiful letters and words right away. But that’s not how it works; just like any other practice, you need to get a good grasp of the foundation. In calligraphy, we have a bunch of basic strokes that you’ll need to master first in order to start creating great things. You’ll see that each basic stroke has a point – each of them will be used in certain letters – so if you practice them a lot, it will be a lot easier to transition to writing letters and words.
The Thin Upstroke
For the thin upstroke, grab your pen and press it gently from the bottom to the top. Remember to press it very lightly, with little pressure on the pen.

The Thick Downstroke
The thick downstroke is exactly the opposite of the upstroke. You have to press the pen hard from the top to the bottom. Don’t be afraid to put pressure on the brush pen – it’s what they were made for!

The Underturn Stroke
For the underturn stroke you have to start at the top by pressuring hard and then you can transition to the upstroke very lightly.

The Overturn Stroke
The overturn stroke is the opposite of the underturn stroke. You start with the thin upstroke at the bottom and then you transition to the thick downstroke.

The Compound Curve
The same principles of the overturn stroke can be applied here. The only difference is that you don’t stop once you transition to the thick downstroke; you need to keep going and transition to the thin upstroke once again.

The Oval Stroke
For the oval stroke, you can start halfway through the thin upstroke, then you transition to the thick downstroke and transition to the upstroke again to finish the oval.

You may also practice the oval going the other way. Start with the upstroke, transition to the downstroke and then finish it with an upstroke again.

The Ascending Loop
For the ascending loop, start by pressuring lightly to create the thin upstroke and transition to the downstroke.

The Descending Loop
The descending loop stroke is exactly the opposite of the ascending loop. Start by doing the thick downstroke and transitioning lightly to the thin upstroke.

You can also make the loop turning to the right.

Writing Brush Calligraphy Letters
Once you feel confident after practicing the basic strokes for some time, you can move on to the letters! Here’s where the fun starts and you’ll see how mastering the basic strokes first will help you master the letters as well.
In this section, we’ll break through every single letter of the alphabet. You’ll learn what basic stroke is needed to form each letter.
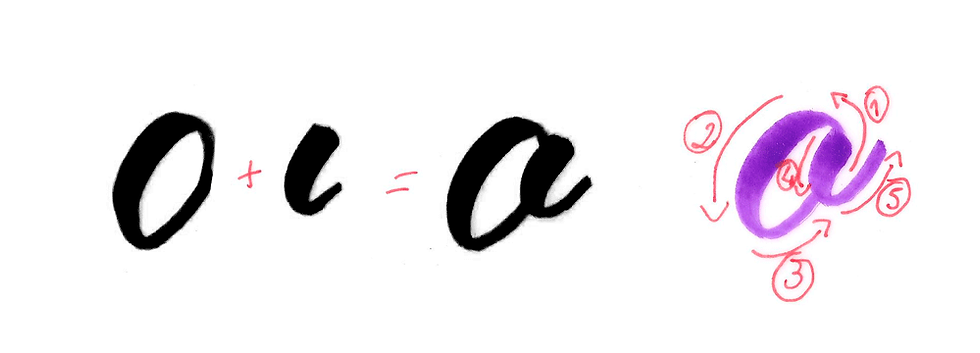
Letter A
Basic Strokes: Oval + Underturn

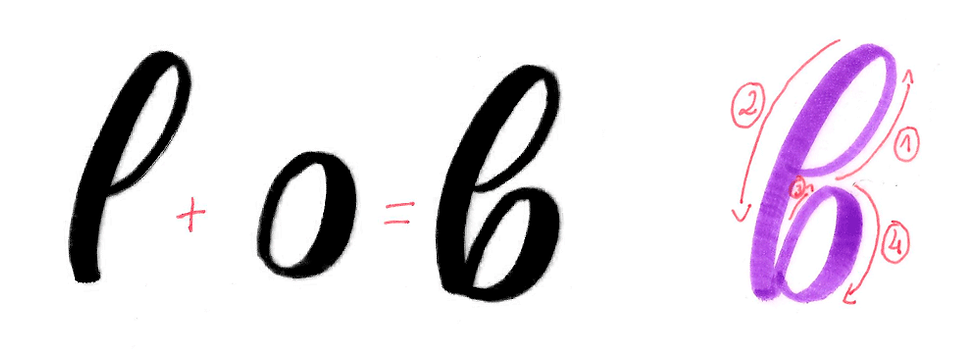
Letter B
Basic Strokes: Ascending Loop + Upstroke + Underturn
Letter C
Basic Strokes: Incomplete Oval

Letter D
Basic Strokes: Oval + Big underturn

Letter E
Basic Strokes: Upstroke + Downstroke

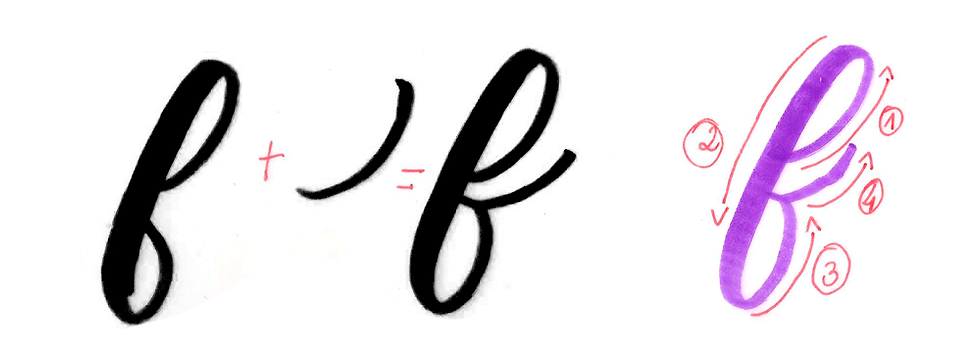
Letter F
Basic Strokes: Ascending loop + Descending loop + Upstroke
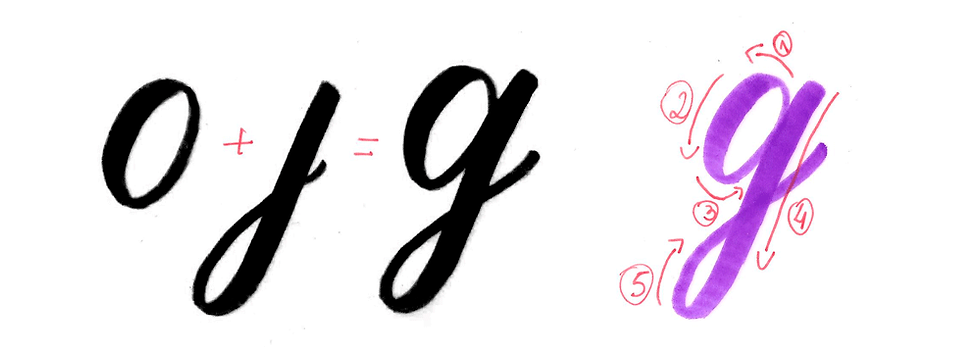
Letter G
Basic Strokes: Oval + descending loop
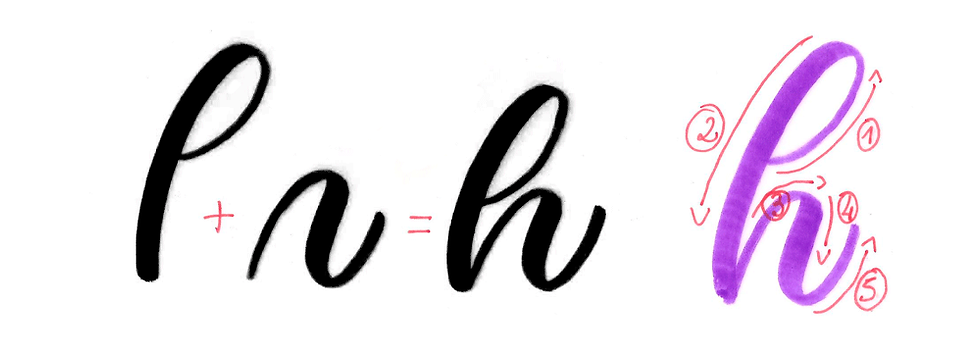
Letter H
Basic Strokes: Ascending loop + Compound curve
Letter I
Basic Strokes: Underturn stroke

Letter J
Basic Strokes: Upstroke + Descending loop

Letter K
Basic Strokes: Upstroke + Ascending Loop + Overturn + Thin downstroke

Letter L
Basic Strokes: Upstroke + Ascending Loop + Upstroke

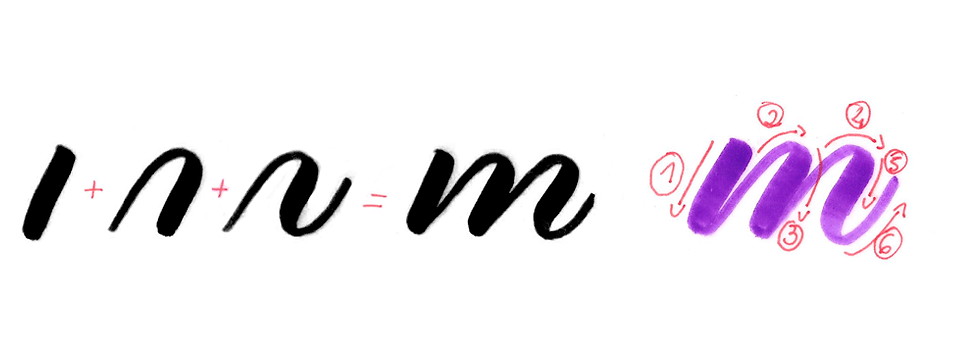
Letter M
Basic Strokes: Downstroke + Overturn + Compound Curve
Letter N
Basic Strokes: Downstroke + Compound Curve

Letter O
Basic Strokes: Oval + Underturn
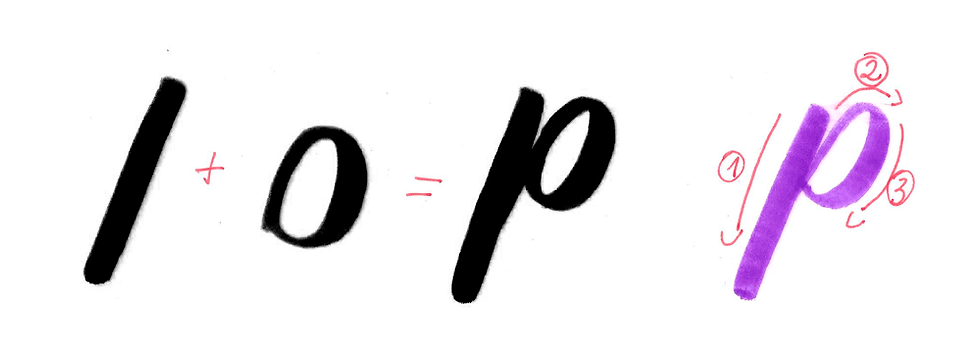
Letter P
Basic Strokes: Downstroke + Oval
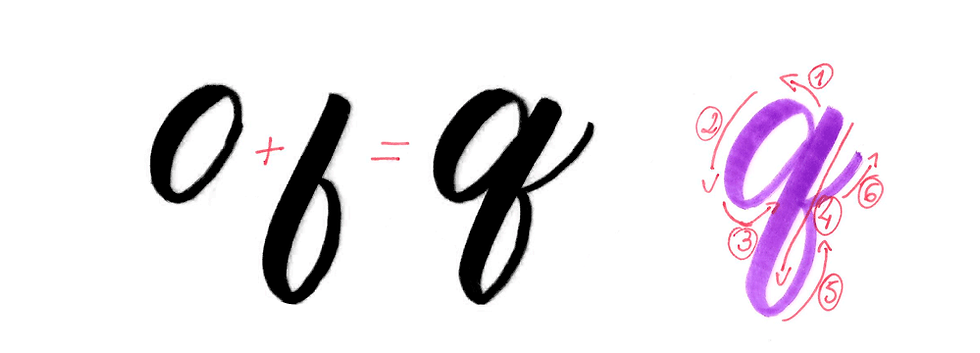
Letter Q
Basic Strokes: Oval + Descending loop + Upstroke
Letter R
Basic Strokes: Upstroke + Downstroke + Underturn
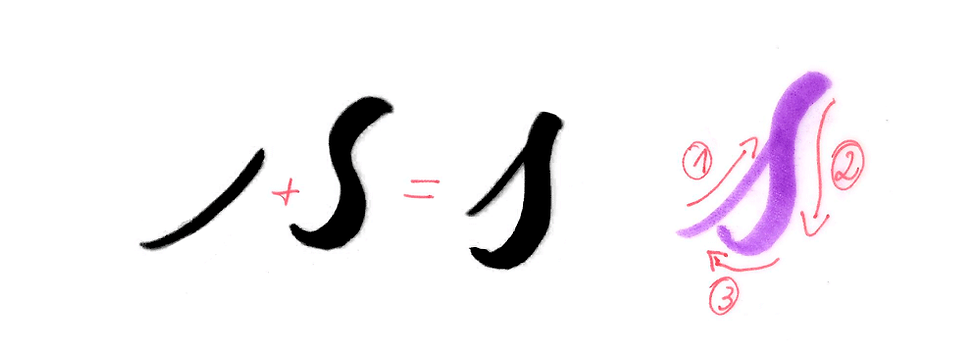
Letter S
Basic Strokes: Upstroke + Downstroke
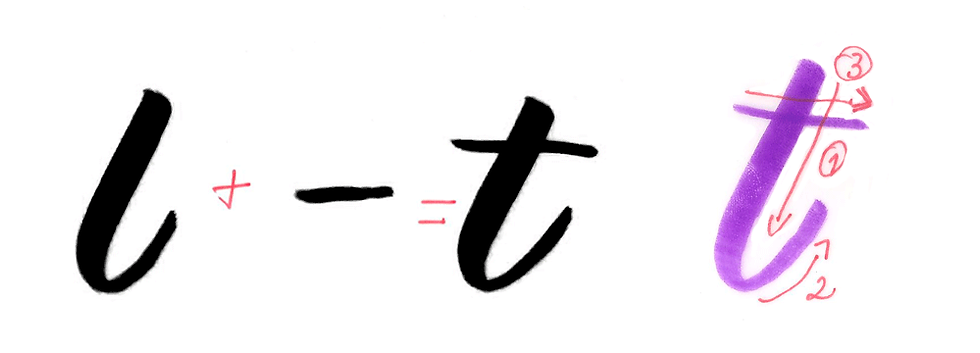
Letter T
Basic Strokes: Underturn + Crossbar
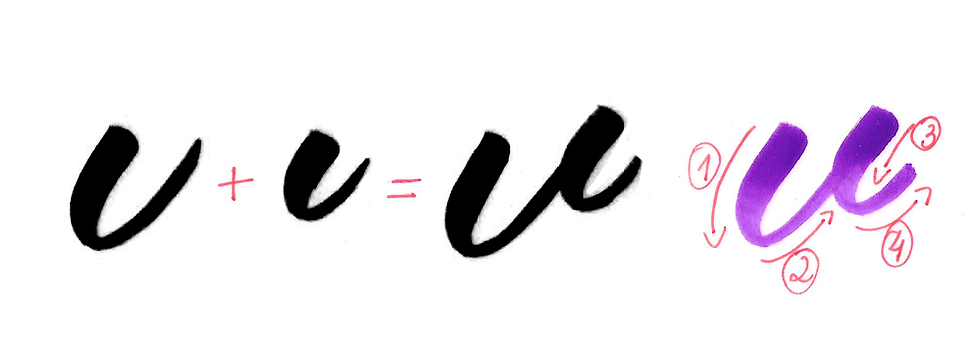
Letter U
Basic Strokes: Upstroke + Underturn + Underturn

Letter V
Basic Strokes: Underturn + Underturn
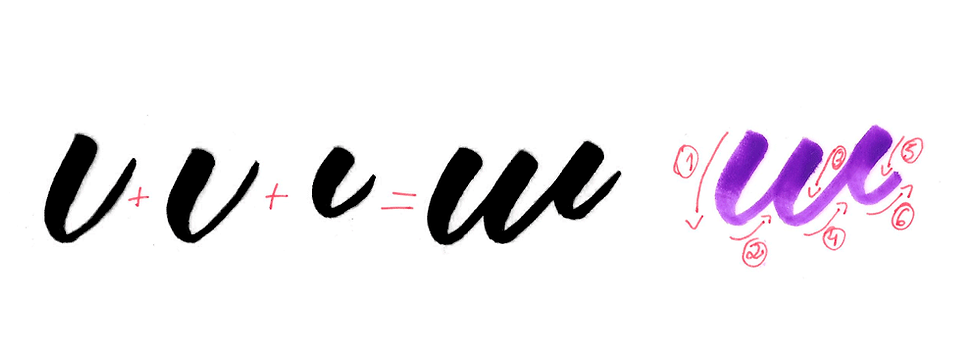
Letter W
Basic Strokes: Underturn + Underturn + Underturn
Letter X
Basic Strokes: Compound Curve + Upstroke

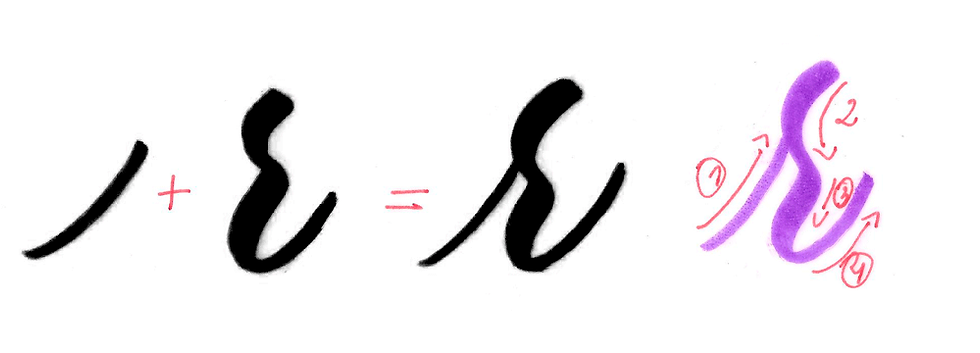
Letter Y
Basic Strokes: Underturn + Descending loop

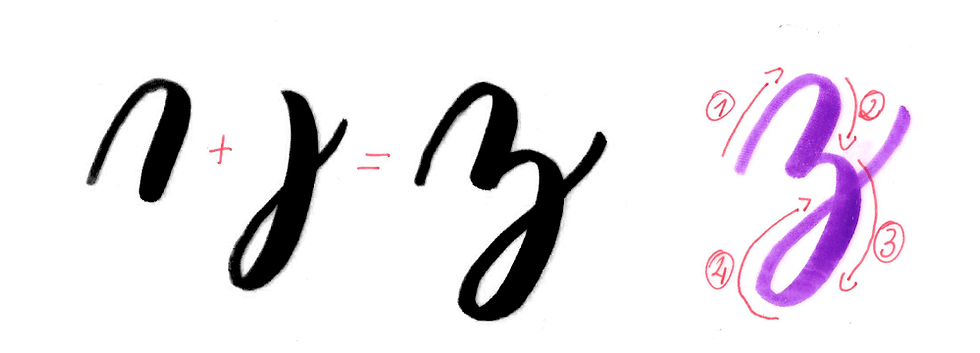
Letter Z
Basic Strokes: Overturn + Descending loop
Writing Calligraphy Words
The next step you need to take is to actually write some words now! After you feel confident enough about your hand lettering, you can begin to write words.
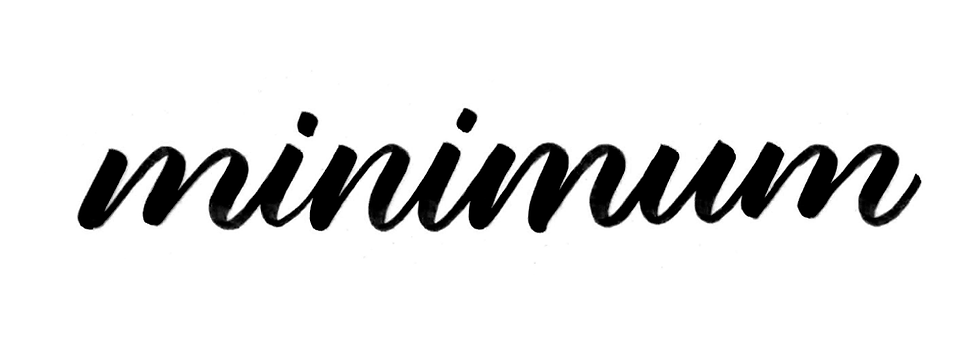
The word “minimum” is great for practicing because it has many basic strokes in it.
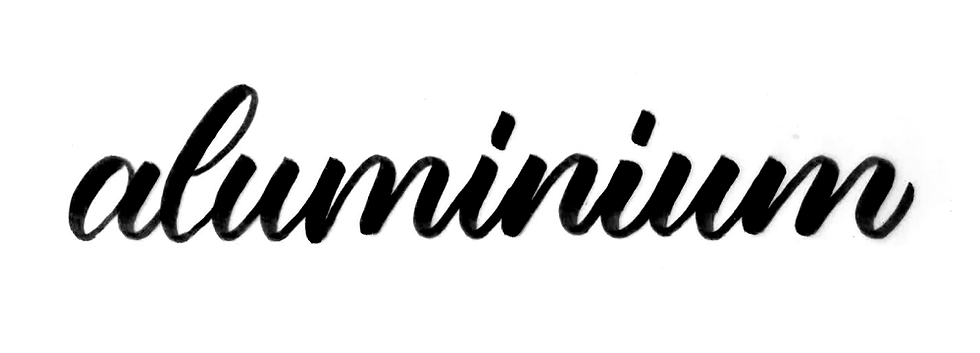
Another word that is good for practice is “aluminum”. Again, this word also has many basic strokes in it.
And then, of course, you can start writing any other words you want!
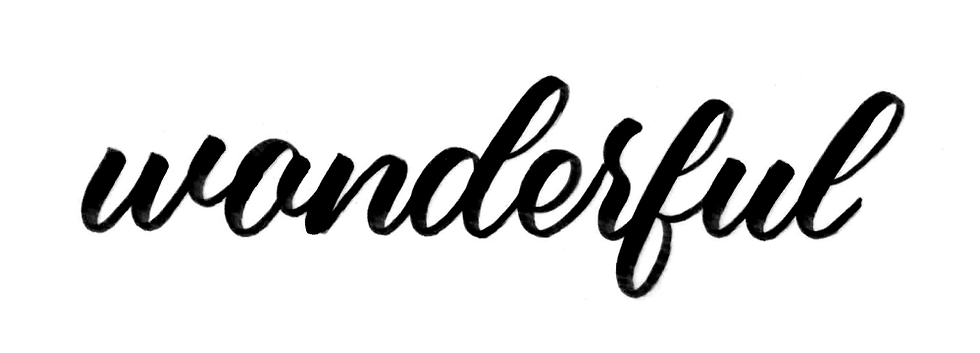
And even quotes once you feel like it!

And that brings us to the end of the hand lettering guide! Practice makes perfect, and you’ll only get better from there. If you enjoyed this guide to hand-lettering, you might want to explore creative hand-lettering by Julia Henze, or learn how to vectorize your own hand lettering artwork. Looking for freebies or want to purchase and use brush calligraphy styled work? Click here.


Comments