How to Attach Your Model and Property Release
- Jun 26, 2020
- 3 min read
Updated: May 13, 2025
Filling up the Model Release & Property Release is pretty self explanatory, but here is our guide on how to go about that.
Note: If you are living in a country that does not use English as its primary language, you may translate the Release(s) into the native language and use it accordingly in the same capacity. Don’t worry, we accept Model Releases in other languages too! If you have your content already submitted to other stock libraries online, we also accept copies of the existing release.
Model Release for Minors:
For models BELOW 18 years of age (BELOW 21 years of age in certain countries)
When shooting models below the age limit, you are required to obtain signatures from the parent or legal guardian of the model.
Click here to download the Releases:
How to Fill in the Releases
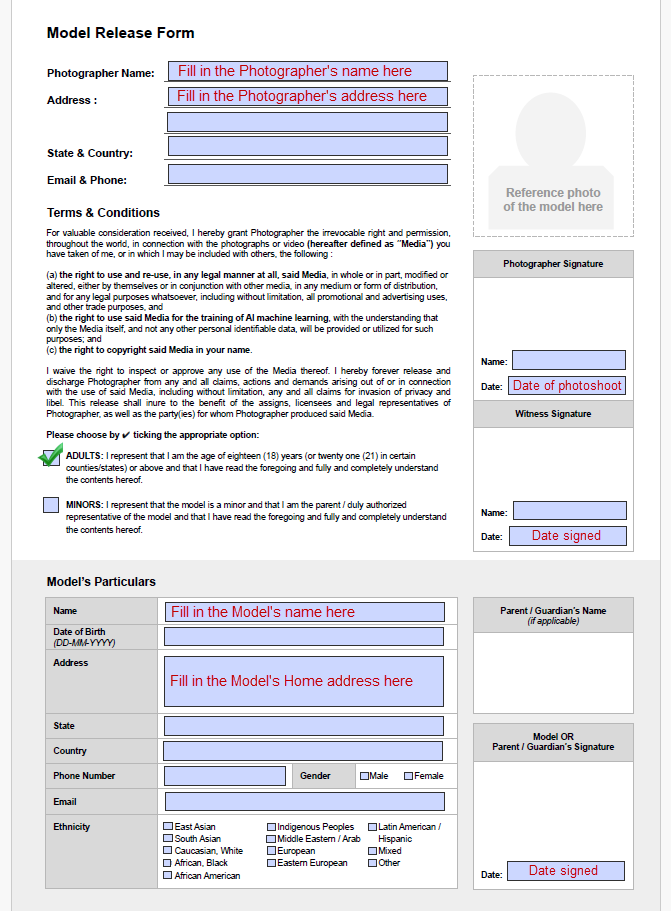
You can use the same Model Release form for both adults and minors. However for minors, you’ll need their parent/guardian’s signature to provide stock photo consent. Please refer to the image guides below on how to fill in Model Releases for models.
Model Release Guide:
For Adults:
For Minors
For Minors:

Filling in the Property Release
Property Releases ensures that the photographs of properties taken by the photographer (you) are given the permission to be published online. You will be required to attach Property Release to artwork done by yourself using Traditional Media (watercolor, oil on canvas etc).
Property Release Guide
For Buildings etc.

For Artwork

NOTE:
Physical copies of the Model Releases & Property Releases can be filled in via handwriting, and must be scanned in an Upright Horizontal position. If you do not own a scanner, you are allowed to snap a photo of the Model Release in the same manner – the information written must be clear and readable on the image.
Photographer’s / Model’s / Property’s information on Model Releases can also be filled in via computer software programs such as Adobe Photoshop or Microsoft Paint but signatures of both photographer and model must be via handwriting.
Releases are accepted in JPG or PDF formats only.
Uploading Your Releases for Your Images
Go to the Contributor’s Dashboard, by clicking on your Username at the top right button and clicking on Contributor Dashboard.

There are 2 ways to upload your Releases:
1) From the Manage Content page
2) From the Manage Releases page
1) Uploading and Attaching your Releases in the Manage Content page
Click on Manage Content (or after uploading your images, you will be brought to the Manage Content page automatically)

.Select the image you would like to attach your Release(s) to, scroll down, click on "Attach Release"

Click on Upload New to upload your Model or Property Release

Select and fill in all the required fields and then click on the Upload button: 1) Browse File : Select your Release file from your computer 2) Select your Type of Release, model or property 3) Fill in the Name of the Model or Property. You may add a Description to it or leave it blank

Your Release will be uploaded and attached to your select image. Do remember to click on Save Draft to confirm your changes
2) Uploading and Attaching your Releases in the Manage Releases page
Click on Manage Releases

Click on the Upload Release button on the top right

Select and fill in all the required fields and then click on the Upload button: 1) Browse File : Select your Release file from your computer 2) Select your Type of Release, model or property 3) Fill in the Name of the Model or Property. You may add a Description to it or leave it blank
Your Release will be uploaded to the page. To attach the Release, click on the checkbox to select 1 or more Releases, then click on "Attach Multiple Releases"

Select the image(s) you would like to attach the release(s) to and click on the "Attach" button

There will be a pop up to confirm that your Release(s) have been attached. Click on "Back to Release Manager" to go back to the previous page

You may view the images with the Releases attached to by clicking on the Number with the arrow pointing down

We hope this guide has been helpful! Do not forget to submit your Image(s) for review once you have completed all the steps.


Comments