How To Make A Quick And Easy Instagram Post For Valentine’s
- Feb 12, 2020
- 2 min read
Kind of in a rush, but you need a quick Instagram post to go out in a hurry? You can definitely make one in around three minutes tops, with Pixlr X’s presets at the ready. So there’s really no excuse not to make your photo edits with a number of stunning image effects and gorgeous filters at your fingertips!
Let’s get started, shall we? I’m using a romantic sunset photo by frank mckenna on Unsplash by the way, which is absolutely perfect for our Valentine’s theme in this tutorial!
Step 1
Drag and drop in your own photo of choice, or pick one using the built-in stock search that Pixlr X has. You can duplicate the layer if you like, just to be on the safe side. I didn’t, seeing as I kinda already had a rough idea of what I wanted to create. As always, I believe in experimenting to learn what your designing or editing style is like.

Step 2
Crop your image, or resize it. I found cropping my photo a lot easier, because I already knew the size for Instagram that I wanted: 1080 x 1080px. It’s great how the uniformity of squares makes designing and editing so much easier and cleaner.

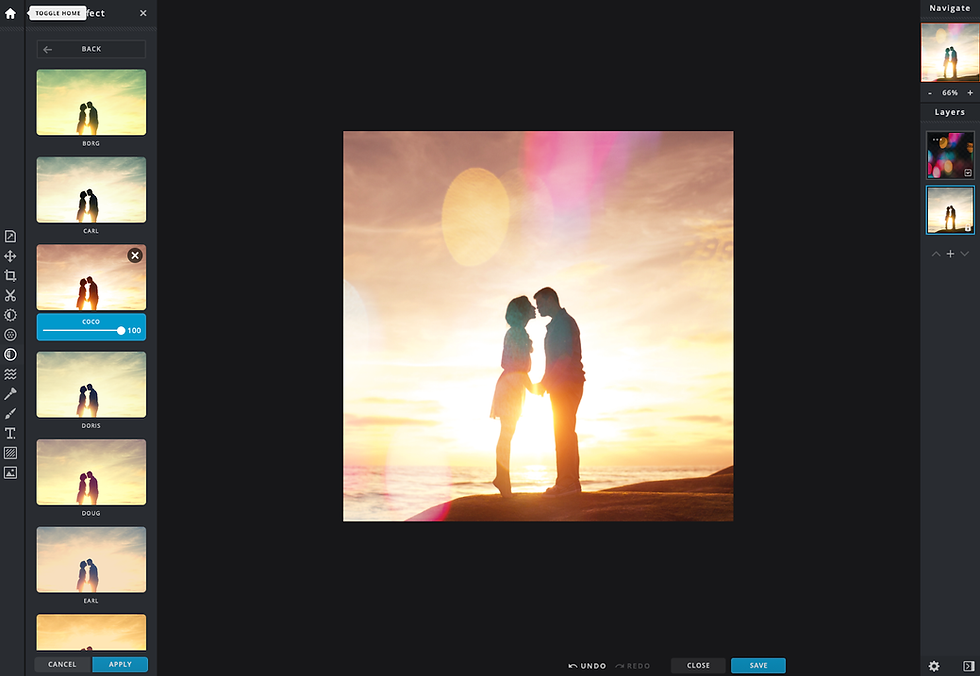
Step 3
Next, I went straight for the Overlay section, which is the second last icon on the left sidebar. Selecting Bokeh, I went for the fourth option on the pop-out menu. I set the transparency to 72 out of 100, which made the perfect bokeh effects once they blended perfectly with my photo.

Step 4
And then I started on the effects next – I went with the warmest sunset glow I could find in Pixlr X’s presets. It’s called Coco if you’re looking for the exact same effect! I love how it made the photo turn out extra warm and vibrant, which also amplified the bokeh layer. It totally suits the beach sunset romance we always see in movies!
Step 5
Okay, while most of you might stop at Step 4 and head straight to posting your photo on Insta (which is totally fine), I kinda feel like it needed a bit of context, like a nostalgic Valentine’s memory. So I went ahead with adding an 8-bit heart (because I absolutely adore the little hearts in Mario) and an Instax photo frame to the image.

Ta-da!
Check out the end result below. Now you don’t always have to replicate what I did to the T, I’m just giving you a guide on what you can create with Pixlr X in, well, under 3 minutes, I guess! Since it doesn’t take very long to get something similar done, so why not try it out yourself?

Pixlr X and Pixlr E are both tools that make designing and editing images easier for both beginners and intermediate users across the globe. No matter your current level, Pixlr’s products are meant to add convenience into your creative tasks and subtract the headache of struggling with advanced photo editing software. Give Pixlr a go today – you never know what you might be able to create!


Comments