How To Create An Underwater Mermaid Part 1 [Video Tutorial]
- Jul 1, 2016
- 7 min read
Hi dear readers! We’re so excited for this tutorial as it is our first time introducing VIDEO TUTORIALS! Yes, that’s right! I know many of you lovely people have been asking for it so here goes! Now, bear in mind that this tutorial is an advanced one so attempt at your own comfort level but do shout out in the comments below if you’re having problems or any general feedback would be most welcomed! Always room for improvement, right? Have fun!
Level: Advanced Program: Photoshop CS6, Windows 10 Time: 4 hours
What We Will Be Learning: In the first part of this tutorial we will be learning how to create an underwater mermaid, focusing on how to create a mermaid tail from scratch! While you do not need a drawing tablet, it will make this particular part of the tutorial much easier. You WILL need knowledge of the Pen Tool and layer masks however, so feel free to check out these tutorials first to hone your basic skills!
Note: This tutorial assumes you have knowledge of basic Photoshop functions such as adjustment layers and layer effects.
Images Used: Woman: #31946031@ammentorp
Resources Used: “Silky Scale Brushes” by Imaliea on Deviantart.com
Psst: At the end of each step there is an image of what my layers look like at the point of that step in case you get lost and you can always refer to the video tutorial below!
Video Tutorial
Underwater Mermaid Tut. Pt. 1 from 123RF on Vimeo.
Step One: Prep the Background and Model First, we are going to prepare our model and background.
Create a Color Fill layer and set it to a muted blue (#092332). Name the layer “Background”.
Create a new layer, fill it with black and set it to “Screen”.
Go to Filter > Noise > Add noise. Settings: Amount 5, Gaussian, Monochromatic.

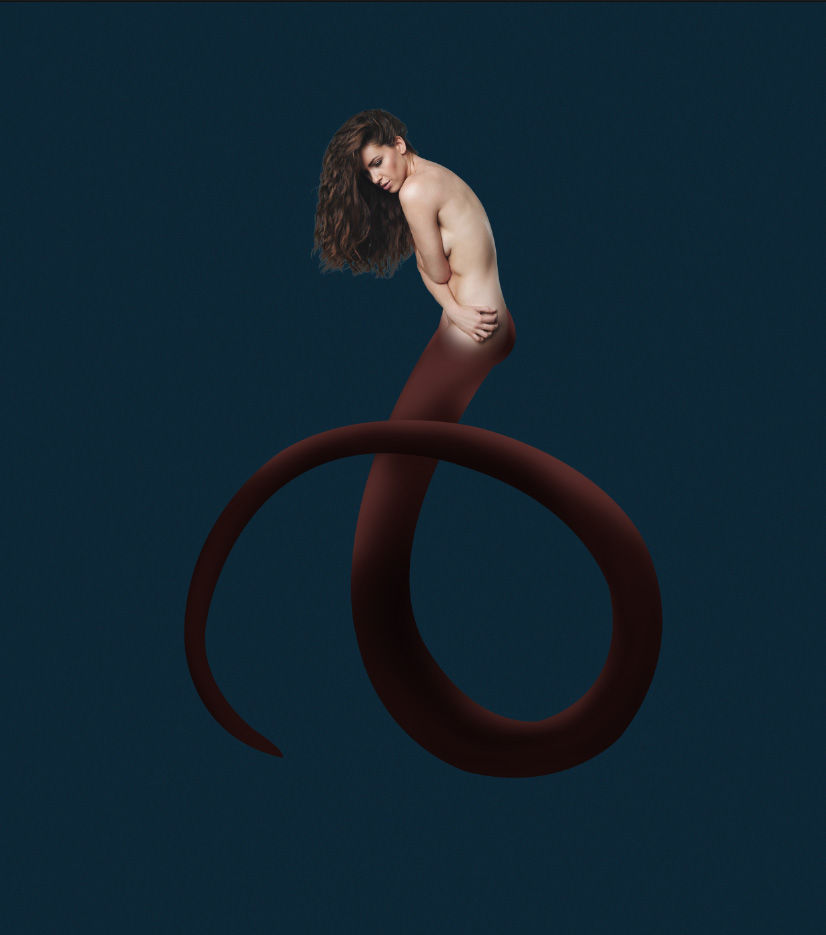
Place and extract your model from their background.
Using the Liquefy Tool, push and pull the models hair so that it looks more like it is floating in the water.
Layers:
Step Two: Creating the Tail Shape Next, we are going to create our tail shape, while I did use a drawing tablet it is not needed.
1. Create a new layer above your model. 2. Using a bright red, hard, small, round brush sketch out your tail. For me, this is what takes the longest, you want to make sure you get the general shape of your tail early on now as it will be difficult to change the shape later on.

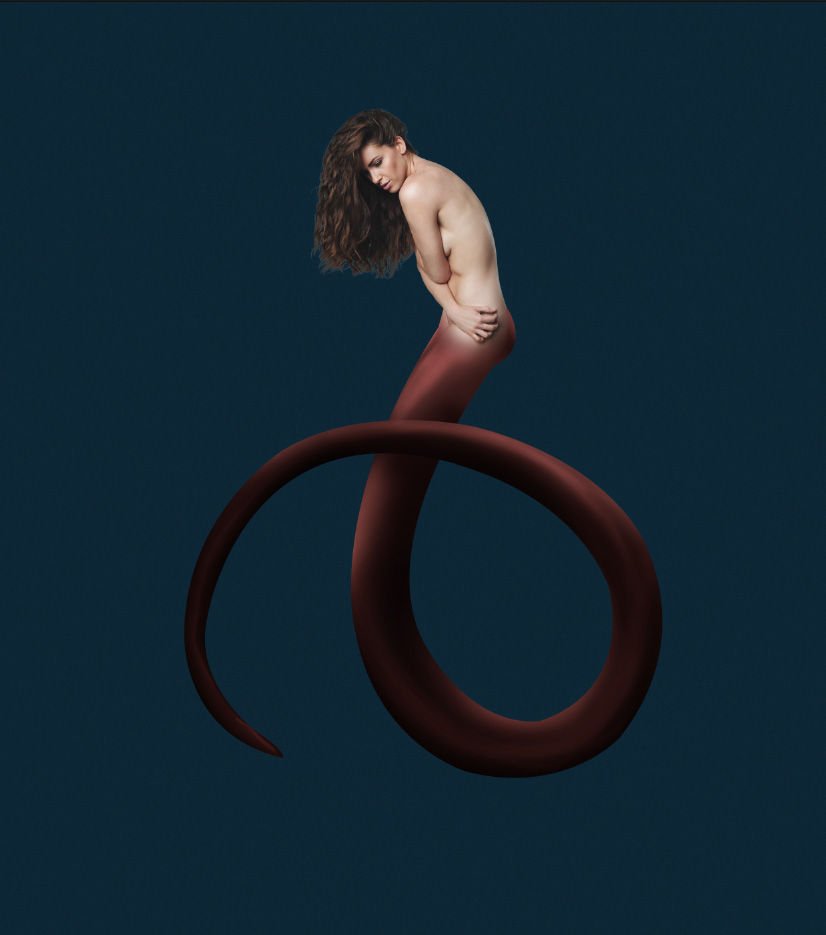
1. Once you have your sketch finished, create a new layer above your sketch layer. 2. Using the Pen Tool set to “Path”, trace the sketch. If you added a loop like I did, only trace half of the tail. Stop when you reach the loop. 3. Now create a color fill layer, the color will only fill where the path is. Set the color to #004f69.

Do the same thing with the second half of the tail. Remember, if you did not add a loop to your tail, you can just do the whole tail in one shape and skip to step 5 below.

Hide the sketch layer.

1. To combine the two shapes, create a new color fill layer and fill it with #220e0e. 2. Fill the Color Fill’s layer mask with black. 3. Hold Ctrl + Shift and click on your two tail pieces to make a selection of both shapes at the same time. 4. With the newest color fill layer mask selected, go to Edit > Fill, Use: White.
Now, we are going to create a stencil that will come in very handy when we start shading our looped tail.
1. Create a new layer and clip it into your new tail.
2. Using a large, round, soft brush paint black in the upper middle part of your tail. Name the layer “Stencil”.

Alt + Click on the second part of your original tail. Hit delete while on your Stencil layer. Delete any black on the loop of the tail. Keep this layer on for now.


Group the Tail Sketch, and two original tail parts together. Name the group “Extras”. Hide the group, and bring it below your background color fill layer.1. To start the skin/tail transition we are going to mask out the top edge of the tail shape. Do this with a soft round brush set to black.

Layers
Step Three: Shading the Tail Shading the tail also requires a lot of patience. We will be separating our light and shadows, painting them on different layers, however don’t worry if you accidentally paint light on a layer meant for dark, it won’t affect the final outcome. It is only meant for organizational purposes.
Here is also where our stencil will come into play, we will be using it by Alt + Clicking it so that it’s shape is selected, then we will Select > Inverse so that we can paint the loop without losing the shape’s edge. The Stencil layer itself will be hidden however, we just need it’s selection shape. Here is an example:

While painting our shadows and highlights we will always have our brush flow set to a low number. Somewhere between 9% and 25%.
1. Create a layer and clip it into your tail. Set it to Normal. We will be creating our first layer of shadows. Name the layer “Shadow 1”.
2. Using a large, soft, round brush with a low flow rate, paint in your first layer of shadows. Build them up slowly. This is much easier with a tablet, but have patience. and use your eraser tool if you are using a mouse.

1. Create and clip a new layer and set it to “Soft Light”. On this layer we will be creating our first round of highlights. Name it “Light 1”. 2. Use the same brush you used to paint the shadows, only this time use white. Remember to use your stencil if you have a loop!
1. Create and clip in a new layer, set it to “Soft light”, and name it “Shadow 2”. 2. Continue to paint in your shadows and contours. Start shaping things like the “thighs” and butt.

Create and clip another layer, set it to “Overlay” and build up the highlights even more. Name the layer “Light 2”. I tend to model my mermaid tails after that of a snake. So they have a vain/muscle running through them. Looking at snake tail references is highly recommended.
Again, more layers of dark and light set to “Overlay”. Do as many layers as you want, and feel free to experiment with layer modes. Below are my final shadows/highlights”

Layers:

Step Four: Tail Details We are going to add scales next. The scale brush used here are the “Silky Scale Brushes” by Imaliea on Deviantart.com, you do not have to use these brushes but I highly recommend them.
1. Under all your shadow and light layers create a new layer. 2. Using your scale brushes (“Silky Scale Brushes” by Imaliea on Deviantart.com), paint your scales following the curves of your tail. Remember to use your stencil! The color does not matter at all. Try and make the scales on the upper part of the tail larger.
Ignore the white, again the color does not matter.
1. Bring the Layer Fill down to 0%. 2. Add a Bevel & Emboss layer effect. Here are the settings I used, feel free to experiment.


I did my scales quite quickly, but the longer you spend on them the better they will look. Group all your tail layers together and name it “Tail”.
Layers:
Step Five: Tail Fins Next, we will be adding some tail fins. We will be doing this using an easy layer mode trick. It can be used with any fin image that has a black background.
1. Find a fish/fin image that is on a black background (image #30497634). 2. Remove the excess black and the fish’s body and head.

1. Set the fish fin layers to “screen”. 2. Resize and shape the first fin using the Warp tool. Mask out any extra scales/tail that you do not want.

1. Clip a Brightness/Contrast adjustment layer into the fin, with the settings -120 Brightness, and 100 Contrast. 2. Clip a Color Balance layer above the B/C layer and set the settings to Red -4, Green -30, Blue +77.

Now we are going to layer a second fish fin on top of the first. Do the same thing as before, and copy and clip the same two adjustment layers as above.

You can copy the two fins to add extra fins along the tail and on the waist as well. Try and warp and reshape them so they don’t look repetitive. Also mask out any areas that don’t fit.

All these fins were done with the same two fish photos, set to “screen”. Incredibly simple! Group all your fins together and name the group “Fins”.
Layers:
Step Six: The Model Now we are going to start focusing on the model. We will be making the transition between the tail and the body more smooth, also adding a strong back lite/glow to the hair.
1. Create a new layer and clip it into your model. Keep the layer on “Normal”. 2. With a large, soft, round brush paint white on the edges of the hair and slightly on the body. Keeping the brush Flow low will help build up lite and make it more subtle.

1. Create a new layer, and once again clip it into your model. Set it to “Overlay”. 2. With the same white brush paint more white on the hair, focusing on the edges. 3. Create and clip one more layer and set it to “Soft Light”, and again paint more white. The idea is to build up light slowly so there is a smooth transition.
I did mine pretty quickly, but once again, the longer you spend the better it is going to look!
1. Create a new layer below your model, keep it set to “Normal”. 2. Paint solid white behind your model’s head to create the back light.

To finish it off, paint some hair strands using your preferred method. (Hair strand brushes are easy to find!)

Next, we are going to work on the transition from body to tail. We will do this using two simple layers.
1. Create a new layer and clip it into your model. Set it to “Soft Light”. 2. Using a dark purple color (#1d010d) paint the bottom half of the model’s torso. Do not paint on the arm or hand. 3. Duplicate your layer to make it darker

Group all the model layers together, including the hair strands and back light, and name the group “Model”.
Step Seven: Lighting Now, we are going to move on to the lighting. We will be using multiple layers set to a mixture of Overlay, Soft Light and Normal.
1. Create a new layer above your “Noise” layer. Set it to “Soft Light”. 2. With a very large, soft, round brush paint black on the bottom half of your image.

1. Create another “Soft Light” layer and paint a bit more black to darken the very bottom of the image even more. 2. Do the same thing with white, only this time paint it on the top of the image.
Group these three layers together and name it “Water Lighting”.
Now, to add some minor body lighting.
1. Create a new layer above your “Water Lighting” Group and set it to “Overlay”. 2. Paint white around the body/head of the model, and some black on the sides/bottom. Keep your brush soft, large and at a low flow rate. Build the light and shadows up slowly as always.

Add a quick tail fin shadow using a normal layer, and a soft black brush.

To add light and shadow above our mermaid we will use a normal layer, painting white where we want light and black where we want dark. Again remember keep your brush soft, large and at a low flow rate. Build the light and shadows up very slowly. Adjust the layer opacity if needed.
I did this again one more time, only this time I set the layer to “Soft Light”.

You can do this in as manly layers as you want, again experiment with layer modes, opacity, and brush flow.
Layers:
Step Eight: The Final Color We are going to dramatically changing the color and atmosphere and bringing everything together using adjustment layers. You don’t have to use the exact ones I use. Always experiment!
These layers are listed from bottom to top.
1. Color Fill layer: Color #1a0000, Mode Screen, Opacity: 51% 2. Brightness/Contrast layer: Brightness -15, Contrast 38 3. Color Lookup layer: Teal Orange Contrast, Opacity 27%

1. Color Lookup layer: (Device Link) Smokey, Opacity 39% 2. Color Lookup layer: Fall Colors, 58% 3. Color Fill layer: Color #ffe6be, Mode Multiply, Opacity 49%

Group all the color layers together and name the group “CC” for Color Correction.
Final Layers:


And we are done! Make sure and keep an eye out for PART 2 next week, where we will be making this mermaid MUCH more impressive and giving her an intense underwater environment! In the mean time always experiment with different tails, and colors and techniques. There is no one way to do things!


Comments